


The Secret To Perfect Cauliflower Pizza Crust
ORIGINAL POST FOUND HERE
Gooey cheese, chunky tomato sauce… I’m already drooling.
But since traditional pizza is mis-combined, thank goodness for whoever came up with the idea of making a cauliflower-based pizza crust. Now we can have our crust AND cheese, and eat it, too! All without feeling sluggish and greasy afterward.
You may remember that I’ve tried my hand at a cauliflower crust before. It was fine, but definitely more egg-y than traditional pizza crust—> and it certainly couldn’t be picked up by hand!
Luckily for us, Doris has taught me the secret to making perfect cauliflower pizza crust.
The kind you can pick up with your hands.
The kind that will fool your family.
The kind you’ll want to eat again and again!
Cauliflower Pizza Crust
makes 1 large crust
Recipe courtesy of Doris Choi
Ingredients:
4 cups cauliflower rice, steamed and strained
1 egg, beaten
1/3 cup soft goat cheese (chevre)
1 teaspoon dried oregano
pinch of salt
Directions:
Preheat your oven to 400F, then get to work on your crust.
Step 1: Begin by making your cauliflower “rice.”
Simply pulse batches of raw cauliflower florets in a food processor, until a rice-like texture is achieved.


Step 2: Steam & Strain the rice.
Fill a large pot with about an inch of water, and bring it to a boil. Add the “rice” and cover; let it steam for about 4-5 minutes. Drain into a fine-mesh strainer.
Now here comes the secret:
Once you’ve strained the rice, transfer it to a clean, thin dishtowel.

Wrap up the steamed rice in the dishtowel, twist it up, then SQUEEEEEEEZE all the excess moisture out!
It’s amazing how much liquid will be released, which will leave you with a nice and dry pizza crust.
–
Step 3: Make & Shape the dough.
In a large bowl, mix up your strained rice, beaten egg, goat cheese, and spices.
Don’t be afraid to use your hands! You want it very well mixed.

It won’t be like any pizza dough you’ve ever worked with, but don’t worry– it’ll hold together!
Press the dough out onto a baking sheet lined with parchment paper. (It’s important that it’s lined with parchment paper!)

Keep the dough about 1/3″ thick, and make the edges a little higher for a “crust” effect, if you like.
–
Step 4: Bake!
Bake for 35-40 minutes at 400F.

The crust should be firm, and golden brown when finished.
–
Step 5: Load on the Toppings!
Now’s the time to add all your favorites– sauce, cheese, and any other toppings you like.

This goat mozzarella is ridiculously good, without a “goat-y” flavor.

Time-Saving Tip: I recommend making a double-batch of cauliflower pizza crusts–> make one for now, and save one for later. After baking the crusts and adding the toppings, wrap up the whole pizza in foil, and FREEZE it for a quick “frozen pizza” to enjoy another night! Simply thaw and bake at 400F, as directed below, until the cheese is hot and bubbly.
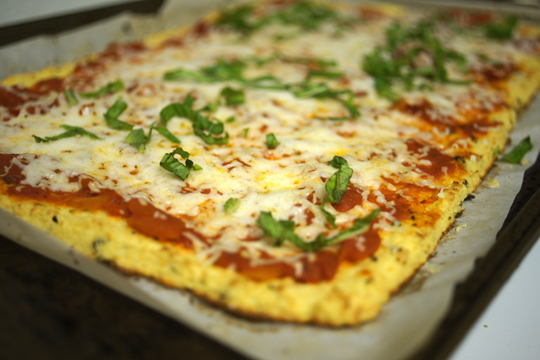
Return the pizza to the 400F oven, and bake an additional 5-10 minutes, just until the cheese is hot and bubbly.
Then slice and serve immediately!

There is something so comforting to me about eating retangular-shaped pizza slices.

It’s reminiscent of cafeteria pizza… only WAY better.
Hope you try this the next time a pizza-craving strikes!
No comments:
Post a Comment